
Please check the package for damage. If there is any, report this IMMEDIATELYto the shipping agent. Examine your Sorcerer carefully for concealed damage and report this IMMEDIATELY to an authorized Exidy dealer, or to Exidy Customer Service.
All inquiries relating to service or repair of Exidy computer products should be directed to an authorized Exidy dealer or to Customer Service, Data Products Division, 390 Java Drive Sunnyvale, California 94086. You must have a return authorization number for all merchandise returned.
Carefully unpack the Sorcerer. Remove all packing material. Be sure to locate all cables, documentation, cartridges, etc. Save the shipping carton in case you need to transport the Sorcerer.
CHECKLIST: Be sure you have each item.
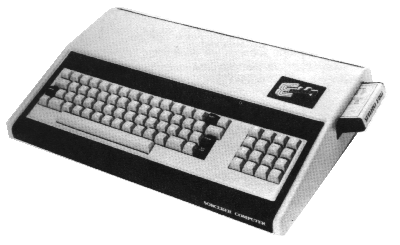
Sorcerer Computer, 1
each
Video Display Cable, 1 each
Cassette Recorder Cable, 2 each
Guided
Tour Manual, 1 each
Place the Sorcerer on a counter, desk or other suitable surface, making sure you don't block air passage to the ventilation holes in the Sorcerer case. Plug Sorcerer into any standard, grounded electrical outlet with 120 volt, 60Hz AC power. (Note: Sorcerer can be factory set for operation of 220 volt, 50Hz AC power.)
ROM PACs are plug-in program cartridges which resemble 8-track stereo cartridges. They plug directly into the side of Sorcerer. When properly inserted, a ROM PAC automatically becomes part of Sorcerer's memory (see Appendix A). Your Exidy dealer has ROM PACs containing languages and operating systems such as Standard BASIC, a Word Processor, and a Development PAC(TM) (Assembler/Editor). Insert these cartridges into the side of the Sorcerer (label side up) when the AC power is OFF.
CAUTION: Cartridges should be inserted or removed from Sorcerer ONLY when the AC power is off, to protect the programs.
Turn the power to Sorcerer off by depressing the rocker switch at the back of the unit. Insert the ROM PAC into the side of Sorcerer (label side up). Push on the cartridge until it feels like it is in place with its mating connector. The cartridge indentations for gripping should be exposed outside Sorcerer.
The video signal output at the rear video connector of Sorcerer is composite video (refer to Figure 1). The cable provided has a mating connector for both the Sorcerer output and the Exidy video display. (Note: An approved second source of video display for the Sorcerer is the Hitachi P/05M receiver monitor.)
If you do not have a video display monitor you can use a standard black and white television if you have an FCC approved RF modulator. The modulator connects the video output of Sorcerer directly to the antenna lead-in connection of your television set. This is cumbersome and produces a more distorted picture than a direct video display monitor.
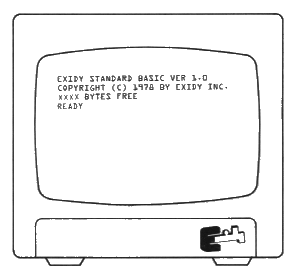
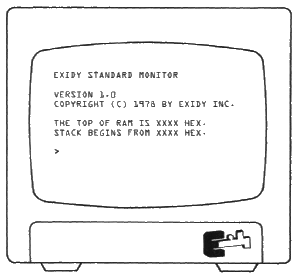
When the video cable is attached to the Sorcerer and power is applied to both the display and the Sorcerer, a message will appear on the screen:
With a ROM PAC inserted correctly into the side of Sorcerer, you will see a ROM PAC sign-on message on the screen. This is the Standard BASIC signature.
Without a ROM PAC inserted into the side of Sorcerer, the internal Power-On Monitor program is automatically executed and the above message displayed.
If you do not see a message on the screen, proceed as follows:
IF YOU STILL DO NOT SEE THE APPROPRIATE MESSAGE ON THE SCREEN, CONTACT YOUR EXIDY DEALER FOR HELP.
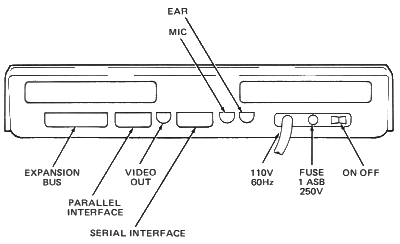
Figure 1. Connector Locations at the Back of Sorcerer
It is not necessary to connect the cassette recorder unless you plan to load programs into Sorcerer or save programs stored in Sorcerer by recording them on a cassette tape.
There are two types of connectors at the back of Sorcerer for connection to cassette recorders (refer to Figure 1). Most of the time you will be using only one cassette recorder in manual operation, either playing a pre-recorded program into Sorcerer, or recording a customized program out. For those simple operations you will find two identical cassette recorder cables included with Sorcerer. Use them to connect the cassette recorder (MIC and EAR connectors) to the appropriately labeled MIC and EAR connectors at the rear of the Sorcerer.
If you want to conect two recorders, or have Sorcerer control your recorder's on-off switch, you can order a special data cable, Part No. DP4005. This cable attaches to the 25-pin connector labeled Serial Interface (refer to Figure 1).
It is important to adjust the cassette recorder for proper tone and volume setting. A general rule of thumb is a setting of half-on for both tone and volume. (Example: If your control knob is labeled 1 to 10, a setting of 5 would be appropriate.) Every recorder has different characteristics. The type of cassette tape used also effects the performance. Exidy data cassettes are recommended (Part No. DP3001) and are available as accessory items.
You can test the cassette tone and volume adjustments by writing and reading some test data. The following procedure uses the Sorcerer's operating system as a data source.
Depress the SHIFT LOCK key
Type: DU E000 E01F RETURN
(Be careful to include all the spaces.) Sorcerer will print a table of numbers and letters on the screen. Copy the body of the table on a piece of paper (don't bother with the data at the top and left side).
Now check that the two connecting cables are installed in the proper connectors of the recorder and Sorcerer. Insert a blank cassette into the recorder and rewind to the beginning of the tape. Press the RECORD and PLAY buttons on the recorder and wait five seconds.
Now type: SA TEST1 E000 E01F RETURN
After a few seconds the prompt (>) will appear; this means your data has been recorded. Rewind the tape.
Type: LO TEST1 1 0000 RETURN
Press the PLAY button on the recorder. After about half a minute, this message should appear on screen:
FOUND - TEST1 0020 E000 0000
LOADING
Shortly after, Sorcerer should print some additional information and another prompt, to tell you that the data has been loaded back into the Sorcerer.
If you cannot get the FOUND message, or if you get a tape ERROR message, rewind the tape, re-adjust the recorder's tone and volume, and try again. When you get the data loaded into the Sorcerer,
Type: DU 0000 001F RETURN
Sorcerer will print a table of numbers and letters; compare this with the data you copied on paper.
If you have a Standard BASIC ROM PAC, you can test the cassette tone and volume by writing and reading a test program. Insert the ROM PAC as described above, and follow this procedure:
Depress the SHIFT LOCK key
Type: NEW RETURN
Type: 10 PRINT "THIS IS A TEST" RETURN
20 END RETURN
To make sure the Sorcerer accepted your test program into memory:
Type: LIST RETURN
The program should appear on the screen.
Execute the program.
Type: RUN RETURN
The message THIS IS A TEST should be displayed on the screen. To save your program on a cassette tape proceed as follows:
Verify that the two connecting cables are installed in the proper connectors at the cassette recorder and back of Sorcerer. Insert a blank cassette into the recorder and rewind to the beginning of tape.
NOTE: Most cassette recorders have automatic level control (ALC) for recording and no adjustment is necessary to record programs.
Press the RECORD and PLAY push buttons on the recorder. Wait 5 seconds.
Type: CSAVE TEST RETURN
After a few seconds the message READY will appear on the screen. This means your program has been recorded.
Rewind the cassette tape.
Type: NEW RETURN
Type: LIST RETURN
Your test program should not print out on the screen. It has been erased by the command NEW.
Type: CLOAD TEST RETURN
Press the PLAY button on the recorder and after a few seconds the message READY will appear on the screen. Stop the recorder.
Type: LIST RETURN
Your test program should have loaded into memory and should now be displayed on the screen.